Craniofacial osseointegrated bone-anchors
")
Our private Craniofacial osseointegrated bone-anchors services are provided at the Royal Free Hospital, Hampstead.
To find out more about our hospitals click here:
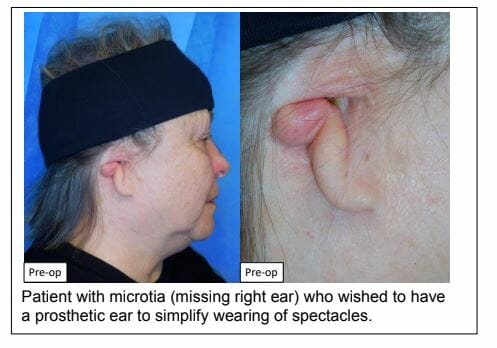
There are many patients with missing eyes, ears and noses as a result of trauma or cancer. In many cases, these absent parts can be replaced with a silicone prosthesis to improve the cosmetic appearance. Doing this can allow patients with extensive facial disfigurement to participate (once again) in normal social discourse and to regain a part of their life that might have been forcibly removed from them – through no fault of their own.
There are many ways in which these prosthetic silicone devices can be attached to the face. Glues are often used, but these can become problematic since they may be messy to apply and may not create a terribly secure method of fixation. As a result, patients may report embarrassing events when the prosthesis falls off at an awkward moment in their life (e.g. when running for the bus). Alternatively, some patients report developing sensitivity to the glues.
Another way for securing a prosthesis is to use an osseointegrated bone-anchor. This method of fixation has been in use for many decades. However, most patients will be more familiar with the use of this technique in the context of securing a false tooth after dental extraction.
The Relimb service at the Royal Free have extensive experience with a variety of osseointegrated bone-anchors (made by different manufacturers) for use in the craniofacial skeleton. However, our preferred implants are manufactured by Southern Implants (based in South Africa).
These bone-anchors are used to hold a silicone prosthesis onto the head and neck region to provide a bespoke solution for fixation – after loss of different parts of the face such as the eyes, nose and ears.
The surgery to place these bone-anchors is relatively simple (especially compared with the bone-anchors that are used for reconstruction after amputation of a limb). Moreover, the surgery can often be performed under local anaesthetic, although most patients prefer their surgery to be performed under a short general anaesthetic.
Planning
Placement of the bone-anchors in the correct position allows a prosthetist to secure a silicone prosthesis more easily. Typically, the prosthetist will need 2 – 3 bone-anchors (3 preferred) to achieve stable fixation of a silicone prosthesis. This is not always possible and a (minimum) of two bone-anchors may then be necessary.
To plan the procedure, plain x-rays and (rarely) CT scans may also be needed. The surgeon will discuss your needs in clinic and a tentative plan will be made which will then be discussed with our prosthetic partners. In many cases, you may need to be seen by the prosthetist to discuss your needs in more detail – before surgery is performed.
Procedure
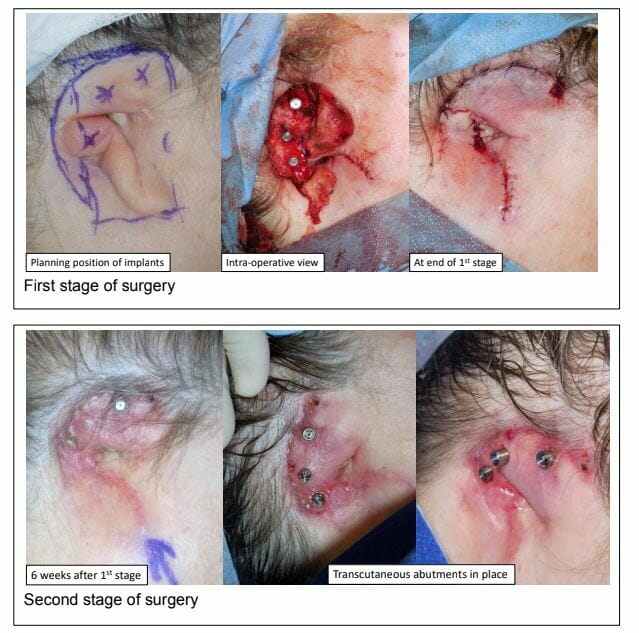
Surgery to place a bone-anchor is usually carried out in two stages. At the first stage, the area for insertion of the bone-anchor is prepared to accept the implant into the bone. This involves removal of all of the overlying soft-tissues and replacement with a thin split-thickness skin graft or skin flap which is applied to the adjacent periosteum. This ensures that the soft-tissues adjacent to the implant will become firmly adherent and will not (tend) to migrate over the transcutaneous parts of the bone-anchor – over the coming years.
The bone-anchors are left in place to osseointegrate for a minimum of 6 weeks (3 months preferred). After this time, the transcutaneous abutments can be fitted.
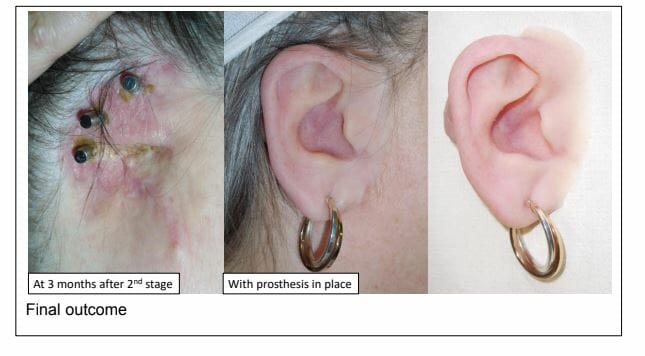
After another 6 weeks, the tissues will have settled, and you can be seen by our prosthetists for final fitting of your prosthesis.
Aftercare
1st stage – At this stage, the bone-anchors are buried under a skin graft and there will not be much for you to see. Most of your aftercare is directed at looking after the skin graft. Fortunately, there is not much for you to do or see while the initial dressing is in place. Once this dressing is removed (typically at 1 – 2 weeks after surgery) you can start to shower your wound (but not soak in a bath). There are often many adherent crusts. These should not be picked-off. They should be allowed to fall off spontaneously. Eventually, after about 2 – 3 weeks, the skin graft will become stable enough to start moisturising it with simple Vaseline. Your skin graft donor site should have healed by this stage and can also be moisturised in the same way.
2nd stage – At this stage, you will see the transcutaneous abutments attached to the bone-anchors. The interface between the skin and the metal components is usually dressed with jelonet and gauze to absorb any exudate. After the first dressing change (at 7 to 10 days after surgery), you will not need to have another dressing applied. Instead, you should start to apply Savlon antiseptic ointment around the base of each abutment. You will need to continue using Savlon ointment in this way – for as long as the abutment remains in place. It will help to suppress any bacterial over-growth in the area and will keep things nice and clean.
Example: