Osseointegration rehabilitation
")
Our private Osseointegration rehabilitation services are provided at the Royal Free Hospital, Hampstead.
To find out more about our hospitals click here:
The rehabilitation process differs depending on whether or not you have had a bone-anchor inserted into your upper or lower limb. The process generally involves 3 phases, but you will be given specific information on your own rehabilitation program (after surgery) and will then be guided through the bespoke protocol for your limb that will be created by our rehabilitation partner – Dorset Orthopaedic.
In general (unless otherwise specified by the surgeon) the rehabilitation process is as follows:
Upper Limb
At six weeks post-op, you should be ready to commence your loading protocol. The protocol depends very heavily on what the surgical team finds about the quality of your bone during the surgery to insert the bone-anchor, combined with your pre-operative bone density (DEXA) results. Therefore, what follows is only an example of the usual loading protocol. Some patients may load at a slower pace, some will load with different timings, some will need additional physio. What is described next is only a guide to the process. Your own (bespoke) protocol will be written out and given to you in table format by the team at Dorset Orthopaedic – during your first loading week.
Phase 1 – STARTING AT WEEK 6
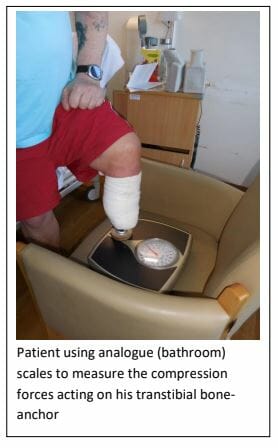
Assuming that you have no bony pain on compressing or distracting the end of the bone-anchor, you can begin loading and distracting the bone-anchor at 1kg for 20 minutes – twice daily. This weight should be increased by 0.5kg every 3 days until the weight of the prosthesis is reached (which is approximately 5 – 6kg depending on the type of prosthesis). Loading should be carried out using an analogue scale (e.g. bathroom scales – see figure of patient loading a transtibial bone-anchor).
Distraction is achieved by attaching weights to the end of the implant using the loading adaptor while standing and holding the limb still for 10minutes – twice daily. Once 4kg has been achieved, then distraction loading can become dynamic. By dynamic, we mean that you will be encouraged to walk with the weighted loading adaptor, while swinging the arm to recreate the same pendulum effect that would occur when wearing a prosthesis.
Rehabilitation sessions consist of 20 minutes of loading followed by effusion management. Effusion management involves the application of a cold compress or soft tissue massage of the soft-tissues at the end of the stump. A clinician will also monitor your temperature, pain levels and stump circumference during this time.
You will also begin rehabilitation exercises for your muscles. This will involve the use of electrical stimulation to improve muscle activation and tone. However, pain levels must stay below 3/10 in order to allow you to continue with loading. Note that muscular pain is quite usual during this time, as are swelling of the stump and stiffness of the most proximal joint.
Fortunately, bone pain (e.g. on compressing the bone-anchor) is not common and the therapists will constantly monitor you and ask if you feel any pain in the bone when the bone-anchor is loaded, and may modify the rehabilitation protocol accordingly.
Phase 2 – HOME LOADING
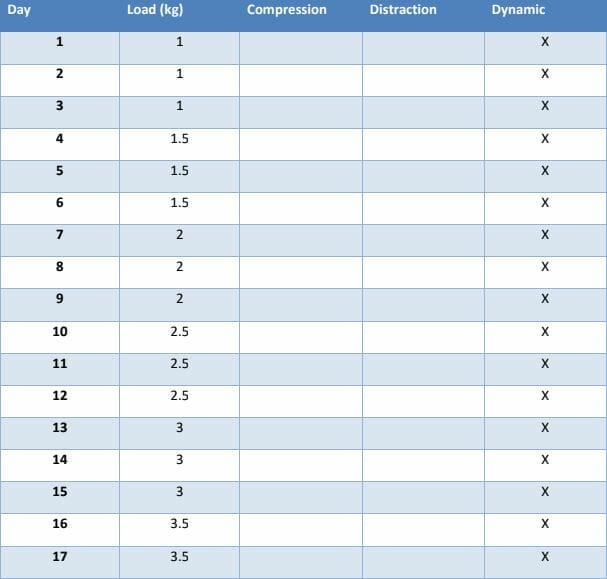
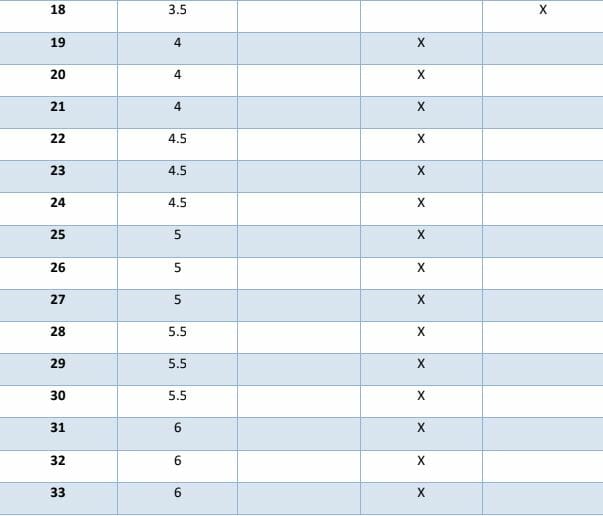
When you return home, you will be given an exercise sheet and a loading plan that takes you up to the required weight to use a prosthesis. The whole process of gradual loading should take around 4 weeks. The initial load bearing phase of days 1-18 consists of compression and static distraction loading. However, from days 19-33, the loading changes to compression and dynamic loading.
At all times after surgery, you should continue to monitor your temperature and any changes in colour or tenderness around your stoma. If you have any concerns, then please contact the Relimb surgeons and/or GP to arrange an urgent review.
Over the same period, you will have weekly or bi-weekly 1-hour check-up appointments with the therapist that will be assigned to you by Dorset Orthopaedic.
The table below gives you an indication of the typical schedule used for loading an upper limb bone-anchor after surgery.
Etc…
Phase 3 – THE PROSTHESIS. This phase involves the fitting and alignment of your definitive prosthesis. This phase in the process will not occur until you have reached the necessary weights for distraction or compression – without experiencing bony pain when the prosthesis is attached. Once the prosthesis has been fitted, and you are comfortable with the weight of the device, then the process of learning how to move it can also begin.
Many of the patients undergoing osseointegration in the upper limb will have had a targeted muscle reinnervation (TMR) procedure performed – at the same time. Details of the TMR procedure and how this works are given elsewhere on these webpages. The main aims of the rehabilitation therapist are to help you to recover voluntary control over the reinnervated muscles and to strengthen the muscle contractions in the reinnervated muscles. The earliest that most TMR patients will become aware of any recovery of voluntary control over muscle contraction in the reinnervated muscles is about 2 – 3 months after the surgery. So, please don’t be disappointed if nothing seems to happen for a long time.
Typically, recovery of control over the reinnervated muscles is accompanied by a sudden reduction in your levels of phantom limb pain. However, sometimes, this process can be more prolonged and can take up to 12 months (or more) to be complete. This is clearly a positive development for most upper limb patients but is a process that can be greatly accelerated and augmented by rigorous co-operation with the instructions of your rehabilitation specialist.
Lower Limb
Unlike the upper limb, patients can often begin loading their bone-anchor just a few days after surgery. However, the specific protocol that will be used in your case depends very heavily on what the surgical team finds about the quality of your bone during the surgery to insert the bone-anchor, combined with your pre-operative bone density (DEXA) results. Therefore, what follows is only an example of the usual loading protocol. Some patients may load at a slower pace, some will load with different timings, some will need additional physiotherapy. What is described next is only a guide to the process. Your own (bespoke) protocol will be written out and given to you in table format by the team at Dorset Orthopaedic – during your first loading week.

Phase 1 – Assuming that you have no bony pain on compression, torsion or distraction of the bone-anchor immediately after surgery, then your initial rehabilitation will involve the loading of a static weight by standing on a bathroom scale using a loading device attached to your bone-anchor (see picture).
Loading may commence as soon as the next day after surgery and should continue until you achieve 50% of your bodyweight or 50 Kg. You may start your loading with up to 20kg going through the implant. This will progress by 5kg per day until you reach 80-90% of your bodyweight. To achieve these targets, you will spend 5 days (3 hours each day), with your Dorset Orthopaedic clinician. This rehabilitation will be spread out over the course of the day.
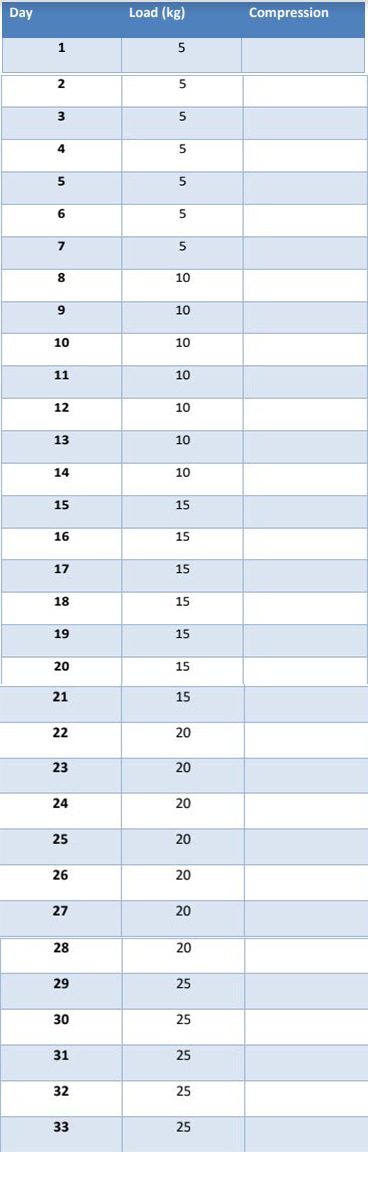
However, the specific speed with which you reach your targets, and the speed with which you will be advanced through the protocol will be determined by your bone quality (which was measured pre-operatively with a DEXA scan). The surgeon’s impressions of the quality of your bone (intra-operatively) will also be taken into consideration. As a result, patients who have a greater reduction in their bone density may be asked to follow a slower loading protocol. This usually starts at 5kg and increases by 5kg per week up to half your bodyweight.
After this, you will be fitted with your prosthesis and will continue to the partial weight bearing stage. This extra loading time is needed to ensure the bone becomes strong enough to bear your bodyweight without causing pain when loading the bone-anchor and reduces the risk of a periprosthetic fracture. This may occur if the bone is over-loaded too early.
Assuming that there are no specific concerns about the quality of the bone and assuming you remain free of bony pain at all stages of your rehabilitation after surgery, then many of our patients can begin walking with a prosthesis as little as 6 weeks after insertion of their bone-anchor.
The table below gives you an indication of the typical schedule used for loading a lower limb bone-anchor after surgery, when following a slow loading protocol.
Etc….
Phase 2 – this only applies to above knee amputees and involves getting fitted with a light prosthetic leg for gait training. You will also start taking your first steps, aided by parallel bars and (when it is safe) and will then progress to using two crutches with your prosthesis, when walking.
Phase 3 involves the fitting and alignment of your definitive prosthesis. Once fitted, you will be allowed to walk with two crutches for 6 weeks. This will be followed by one crutch for another 6 weeks then unaided thereafter. It is absolutely critical that all measures are taken to minimise the risk of falls and to prevent premature overloading of the implant. The most likely time for a significant fall is during the first 12 months after surgery when patients are doing so well with their rehabilitation that they may become complacent. The biggest concern is a peri-prosthetic fracture of the bone into which the bone-anchor has been inserted. The failsafe mechanisms attached to the prosthesis can cope with the majority of the forces that are generated during a fall – but cannot cope with everything. In particular, you should avoid performing high impact activities – especially for the first 12 months post-surgery. If you look after your implant, we anticipate that it will provide you with reliable service for many years.
Ongoing aftercare
At 3-4 months after surgery most patients will have completed their initial rehabilitation and will be walking without any assistive devices. However, experience has shown us that the whole process of rehabilitation takes about 12-18 months – to reach the point at which you are walking without muscular pain and without concerns about falling. During this period, it is particularly important that you visit your prosthetist and physiotherapist regularly, as you will only continue to improve your gait and balance – with time. Your prosthetist will also instruct you on how the safety mechanism works and how to correctly replace/adjust it should it break in a fall or accident.
Significant discharge from the stoma site following surgery is very normal and will usually lessen during the first 3-6 months after your surgery. However, we do not expect it to dry-up completely and it will not fully mature for up to 12 months. In women, in patients with a short residual limb and in patients who are obese, we would expect to see higher levels of secretion from the skin-implant interface (called the “stoma”) than in others. This natural secretion is normally light yellow or clear in colour. To prevent drips from accumulating on your collector (and causing this to smell), you may wish to apply a split gauze dressing around your transcutaneous adaptor and then gently tape the gauze to the metal components – to hold it in place. Warm saltwater baths can also be helpful to reduce the amount of discharge.
Daily cleaning: Once you leave the hospital, you should begin showering daily. Use your hands to gently wash the stump with soap and water. Ideally, use a hand-held shower head to rinse off your
stoma daily. We also recommended that you use a simple soaps that do not contain perfumes or moisturisers. To remove dried blood and discharge from the metal components, you may wish to use a toothbrush while showering. To aid healing, you should aim to keep your stoma dry and uncovered for as long as possible – each day. We would normally recommend that you keep your stoma and the bone-anchor out of a bathtub, sea water or public swimming pools for at least 1 year after surgery – or until we give you the all-clear to do so (whichever comes first).
Know your components: The osseointegrated implant is intended to become a permanent extension of your skeletal structure. Therefore, we would encourage you to learn how each component is designed to function. The team will explain how each component works, including any regular maintenance and services required. As you increase your activity levels, the components may gradually become loose and you may need to re-tighten them – every 3 months. Our rehabilitation partners can supply you with the necessary kit to allow you to do this yourself – if you wish. However, you will need to purchase this kit yourself.
Infection management: Despite a significant reduction in infection rates (after the introduction of single-stage surgery) infection remains a major risk associated with this procedure. If you suspect that you have an infection (pain, redness, fever or unusual discharge), please contact the team immediately. Describe your condition in as much detail as possible and send photos to the team to assist with the diagnosis. Avoid taking random swab cultures around the stoma skin area and do not begin any antibiotic treatments until you know what type of infection you are treating. The team will guide you on the best route of management.
Support network: Osseointegration surgery is a lifelong commitment. Relimb™ is part of an international osseointegration network which is constantly training new clinicians from centres across the glove. The network endeavours to provide all OI patients around the world with local support. Therefore, if you have any questions or concerns, simply reach out to any member of the osseointegration network.
Osseointegration